Saturday 29 December 2012

The adventurer's essentials


Every year we had make most of our Christmas gifts. My nieces and nephews are getting to an age where we can really really enjoy making stuff for them. I wanted to make a den building adventure kit for my oldest nephew. I had some ideas but I knew the Forest Education Initiative Facebook page would come up with more. They are a real source of inspiration and support for lots of people who work outdoors with children. 

I didn't use all the ideas they came up with as I would have needed a truck rather than a bag to put them all in, but check out the thread here if you would like some ideas too. 


But what's in the adventure bag?


Every adventurer needs a wind up torch...


...and some binoculars. We made these binoculars together on Christmas eve.


To go with the note book and twiggy pencil


Some flags to decorate your den,


A really wide selection of fastening; like ropes and pegs, carabiners and those really practical bungees with bobbles on the end. These are just some of the selection. 


 A really useful tarpaulin made from half of an old tent. It already had lots of zips and eyelet holes, hooks and Velcro fastening points. I added a few more eyelets to make it even more flexible and it is waterproof too, which is a bonus. I also added a piece of parachute silk which was a drogue  from a larger parachute. I added lots of eyelet holes to make good fastening points. You can also see the 'instructions' and the corner of the fleecy sit-mat I made using  a bit more of the tent as waterproof backing.


Every explorer needs a treasure map. This one was embroidered with my sewing machine. 


We made an indoor den on Christmas day and cooked the dinner on the fire...

...and we hung up this sign until dinner was ready. 

Luckily it is a  reversible sign so we could welcome people in too. 


Of course any adventurer needs a useful bag to keep all his supplies in... 


...and interesting things to discover.


Sunday 9 December 2012

Only made from wood; a daily advent of festive winter crafts part 1

I have set myself a creative challenge over on my facebook page. Every day in December so far I have added a new winter festive craft made from things from the woods to a folder full of photographs. 

Here's a round up of my daily ideas so far. 


 I got this lovely idea for a tree made from threaded sticks from 'Michelle made me'  this is now hanging in my office and looks great! 


I learnt to make stars from bendy willow withies a few years back, I saw Alan from Birch Forest School make some of these stars from bramble which works really well and helps clear some of the bramble from the woods. I love making baskets out of bramble and it weaves really well as these stars show. 


I saw this idea for a Christmas tree on Handmade Living Frugally and I really wanted to try it this year. It looks really effective and doesn't fill my living room! I also love that it acts like little shelves for some of my favourite things like the little wooden horse and some of the keys I got in a recent freecycle triumph. 


I've been making little versions of these gnomes with different colours, These festive ones have just gone to live in a school where I was working last week. I found it was much easier for children to carve if you leave the stick longer and cut it to length after the whittling is done. Inspiration for these came from GardenMama.


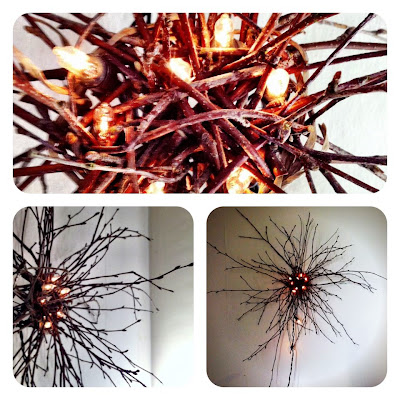
When I made the two trees above I was left with lots of the really fine birch twigs. When they are fresh they are so bendy and I we playing with a pile of them. They are twiddled together to hold this decoration in place. The random weaving is strong enough that I could poke fairy lights through from the back. 


Here is one of the decorations from my tree, this is made out of woven birch bark. There are some great tutorials out there, they are quite fiddly to make but so worth it. Look out for fallen birch trees to take the bark from. 


I managed to get other people involved in my advent challenge. Hannah was one of the participants on my most recent Level 3 Forest School training course. She was exploring the potential of the woods for creativity and found that dead bracken makes an excellent base for wreaths. 


This is another skill I teach on the Forest School course, lashing and knot tying. For smaller children I sometimes give them elastic bands to hold sticks together with instead of tying knots. These stars do look great with a bit of extra festive foliage.


There was a thread about festive ideas on the FEI facebook page recently where I read the phrase 'elder candles' I found some red bramble leaves which inspired me to have a go at trying to work out what an elder candle would look like. The leaves stuck into the soft pith of the elder and with some of the bark peeled away they look quite effective. You could press the leaves to make them last longer.

I hope some of these ideas have inspired you to have a go at making something this winter. Look out for the next few advent crafts coming up. 


Wednesday 28 November 2012

Squirrel Fishing

I thought I'd share with you a little doodle I had in the last edition of the Forest School Association newsletter. This is based on something that happened with a group I was working with a few years ago. 

When you follow the children's ideas you end up in very interesting places! 

forest school, forest schools, outdoor play, nature, children


Sunday 18 November 2012

Sweet treats; Baking in the woods

Well-being is really important, especially if you are working outside all day in the cold and rain. So with that in mind I thought I would share with you some of my favourite outdoor cooking treats, suitable for a day on the woods or a Forest School. 

You'll notice there are no times for any of these recipes, that's because fire baking isn't as consistent as using an oven. I've found the best guide is my nose. As soon as the smells start wafting, I start checking! 


The cake in the picture is cooked in a dutch oven, which is a big cast iron pot with a lid. The lid is designed so you can put embers on top and heat it from above. You don't need to have a special dutch oven, any pan that is suitable for the fire can be used with an oversize lid (to stop ash dropping in). One good tip is to turn the pan lid upside down. The lid then stops the small bits of embers falling off. 

Heat the pan over a fire first to get the temperature up.
 This is just like heating the oven before you put a cake in.
Then put the embers on top with some small sticks to keep
the fire going. 
One thing I'm gradually discovering is if you put all the heat from the top when
baking you are less likely to burn the bottom. 

You can use this technique to bake any kind of cake, biscuit or bread. On a recent Kindling training course Cheryl and Belinda brought a ready made cake mix along to try that.

The result was really tasty! 


Bannock: This is a very traditional way to make unyeasted bread and is very flexible recipe.


This bannock had buttermilk and egg in it which is what made it rise so well.
Chris and Gerard baked this on a Kindling training course. 


Chris and Gerard
Yeasted bread,
sourdough baked in a dutch oven
You can also bake without lugging pans around. I've been baking using hazel leaves to wrap a little bit of biscuit dough or cake mix and then pop the parcels onto a hot stone or pan for 10- 15 minutes or so. 
This macaroon recipe also works really well cooked this way. 


These leaves will be used to cook a bit of cookie dough
Wrap up like a little parcel, and with the ends tucked underneath,


Little cake bites wrapped in hazel leaves. Which is all edible.


You can also use foil for baking instead of leaves but I'm trying to find natural alternatives to foil because of the number of times I have found a nice fire place to cook in and someone has left it full of half burnt aluminium foil. But that said here is another classic outdoor on a fire baking trick. Chocolate pudding in an orange.


This pudding is pretty simple. Cut the top of the orange off and scoop out all the flesh. Half fill the empty shell with a regular cake mix, I think chocolate cake mix works well. Cook in the embers until those smells start wafting! 

Yum! all these treats are making me peckish. I'd better go and chop some wood for the fire so I can really work up an appetite!


Recipe cards made at http://www.blyberg.net/card-generator/

Tuesday 30 October 2012

Bridge that gap

I've written before about building rope bridges among the trees and how fantastic they are for children's motor development, encouraging social skills and confidence and being loads of fun.

What I have also found is that adults who work with children are equally as fascinated and enjoy learning the skills of tying the knots. I thought I would leave some notes here for a refresher for anyone who needs it (you know who you are :) and to maybe inspire you to have a try at tying rope bridges if you haven't yet.


I'll put in links to animated knot videos and drawings to help you along if you need it, but here's the thing about knots, some people learn by watching, some people learn by listening, some just have to have a bit of string and be shown. That's the way different people learn and it doesn't mean one way is better.

Trees:  you want to tie ropes from trees that are solid and secure. Give them a good look over, lean against them and look up noticing if they move too much when you put weight against them. Check there are no dead branches in the crown of the tree that could show a weakness or cause problems. Choose trees that are a good size, not so massive that all your rope gets used up tying on to them but big enough.

Protection: If you are going to leave them up and the tree are smooth skinned like beech or young ash trees etc then put something like carpet or thick fabric under the ropes to protect the bark.


Rope: I use 10ml (or thicker) polyprop rope. It's that cheapish blue stuff. Climbing rope can be too stretchy unless you have static climbing rope.
For length go for two pieces that are as long as a piece of string (!). Mine are about 10 metres each.

Once the children are interested in the idea I encourage them to be fully involved in tying the bridges, taking over completely after the first couple of times with my help. The older children tend to make them more challenging, going up slopes or with non-parallel lines.


Tying the knots: First end is wrapped around the tree three or four times. Tie with a couple of half hitches. The turns around the tree take the pressure off the knot

Wrap the second end of the rope around another tree, leaving a long long tail. go around the tree once and pull it tight "heave, heave etc",  I love getting the children involved at this stage, it takes much longer this way but is so much more fun and they definitely use the bridges more if they have built them.

The working end of the rope then goes over the top of the standing end and back round the tree in the opposite direction.
This is quite heard to type how to do this bit, so I have done a couple of doodles that may (or may not) help.


This end of the rope is tied to another tree.
                     This end of the rope is doing all the work.


Repeat this 3-4 times so the rope is pulled tighter each time.


The zig zagging of each turn, pulled really tight, with more of the "heave, heave" shortens the rope. It is this which pulls it tight.


With the end of the rope, wrap it round and round in a twizzly timber hitch. This stops it over-tightening and is why you need to make sure you have a long long tail on your rope. If you haven't got a long end on the rope then a couple of half hitches works well but can get a bit fiddly to untie


Repeat with the second rope, about a child's height above the first rope. They don't need to be far of the ground to be challenging and the wobbliness adds to the physical challenge.                                                      


Let me know how you get on! 


Tuesday 16 October 2012

What happens in Forest School

There are some projects that really stay with you. I worked with Brudenell Primary School in Leeds for over two years, helping them embed Forest School into their curriculum, and providing training and support.

I also ran lots of Forest School programmes with classes across the school from reception through to year 5.At the end of term the school go together to the local cinema and put on a film of the year's highlights. I put together a film of the Forest School projects, which I thought I'd share with you too.

It reminds me of the stories that emerged, the children and their journeys behind the vignettes.


Thursday 11 October 2012

Reflections on moving from survival to thrival

I have recently come back from a month long trip deep into the wilderness in NW Ontario, Canada. Which almost explains how quiet I have been here recently. It has been a lot to process.

I have talked before about how I the work I do encourages children to challenge themselves and as an adult who supports that then I should be doing the same. But this trip was more than personal challenge (although there were days like that) It was an opportunity to deeply immerse ourselves in nature, to take things at our own pace for weeks at a time and to adjust our rhythms to those of the world rather than the clock.

Sunrise from our camp on West bay.
Photo Tim Rowe

My partner and I packed three weeks worth of food into our packs, travelled to a remote little outfitting town just north of the Quetico Wilderness Park where we picked up a canoe and then quietly slipped off into the woods and lakes for three weeks paddling, portaging and a change of pace. It's the second time we have been to the boundary waters wilderness and with over a million acres of lakes and forest with no roads or houses, there is a lot to take in.

The view from under the canoe, walking a portage trail between two lakes.
Photo Tim Rowe

This trip was different though, I was trying to explain it to a friend and said "we moved from survival to thrival" I had made up a new word, I admit it. But that sense of moving from just coping and surviving to something greater, I needed a word that described a concept just right. As with all the best things I found that someone else had also come to the same realisation.

Early morning paddling. My partner makes these paddles.

One of the key things for me that felt different was our desire to create and how much time we gave to making things. Carving a sculpture from an interesting bit of firewood, making a spoon from a beaver felled greenwood branch, baking... lots of baking, fresh bread and cake every few days and firing our own pottery.

Carving a spoon

We had been told to watch out for one particular trail between two lakes as it was deep clay and it becomes very difficult to walk across if it has been raining. Inspired by sculptures we had seen in the Museum of Inuit Art in Toronto the thought of a cache of deep clay lured us in that direction.

Digging clay from the side of a trail


Shaping the clay

These birds were based on the loons that were often found
swimming around us on the lakes
I have read quite a lot about pit kiln firing and tried a few experiments but we didn't want to make the impact in the environment of digging a pit. So we gradually heated the dried clay things by the fire, bringing them closer and closer to the ember bed, then putting them in the embers. This took about half and hour.


First we added fine twigs and pine needles to the embers to bring the level of heat and cover the clay things, adding bigger and bigger twigs until they were covered and a small fire was burning. 

We added larger pine, birch and conifer twigs until the fire burned really hot. This took another half hour or so and even though the temptation and the heat was unbearable we kept the fire burning at a high temperature for another half an hour. We could see everything glowing red in the fire. Despite wanting to peek we let everything cool down slowly before raking the coals aside to reveal our hoard.
Uncovering the fired clay

Our haul of clay fired goods
When Maslow talks about creativity he talks about self actualisation; "the full use and exploitation of talents, capacities, potentialities" and that these emerge when physiological and safety needs are met. Having experienced the environment and challenge once we were able to find new potentialities in that environment and in ourselves.

Through our experience of thrival I feel like I have managed to empty all the accumulated clutter or everyday experience, strip things back a bit, get a bit of the rawness back in, push myself, to laugh when I have been dragging a canoe all day through an impassable swamp that looks like a river on the map, enjoy, immerse in nature and take time to be. Oh yes that's why I do it.
My new Quetico clay necklace

comment FB

LinkWithin

Related Posts Plugin for WordPress, Blogger...

LinkWithin

Related Posts Plugin for WordPress, Blogger...